When creating a website on Webflow, it is essential to connect your domain name for it to be accessible online. In this article, we will explain how to easily connect a domain name to your website created on Webflow. We'll cover the steps you need to take to set up the DNS settings, link your domain name to your Webflow account, and verify the successful connection. Follow our detailed instructions for a smooth integration between your domain name and your website on Webflow.
Introduction
Choosing a domain name is a crucial step in creating a website. This is the address through which users access your site on the Internet. In this article, we are going to explore the various aspects related to the Webflow domain name.
A domain name can be thought of as the online identity of a business or individual. It should be easy to remember, reflect the content or activity of the site, and be available on the Internet. With Webflow, you have the possibility to register a domain name directly from their platform.
The advantage of using a domain name with Webflow is that it greatly simplifies the technical process associated with putting the site online and operating. By opting for a domain name via Webflow, you also benefit from the advantages offered by this powerful and intuitive platform.
When choosing your domain name with Webflow, it is important to take into account certain factors such as its relevance to your activity or theme, its length and its ease of remembering for your potential visitors. Also, it's best to avoid names that are too similar to existing sites to avoid confusion.
Webflow offers various possible extensions for your domain name such as.com, .net, .org or even country-specific extensions (.fr, .co.uk, .de). Choose the one that best fits your needs and that will be easily identifiable by your target audience.
In conclusion, choosing a good domain name with Webflow is essential to ensure the visibility and accessibility of your website. Take the time to think of a name that is relevant, easy to remember and in line with your business. With Webflow, you can benefit from a complete platform for creating and managing your site, while taking advantage of a simplified domain name registration process.
Do not hesitate to explore the different options offered by Webflow and to choose a domain name that will allow you to stand out on the Internet!
Step 1: Buy a domain name
The initial and crucial step in creating a website with Webflow is the purchase of a domain name. A domain name is the unique address that allows users to access your site on the Internet. It is also used to establish an online identity for your business or project.
Buying a domain name may seem complex, but with Webflow, the process is simple and intuitive. Here are the steps to follow to buy a domain name with Webflow:
- Choosing a domain name: Before buying a domain name, you should think carefully about choosing the best one for your website. It should be short, easy to remember, and effectively represent your business or brand.
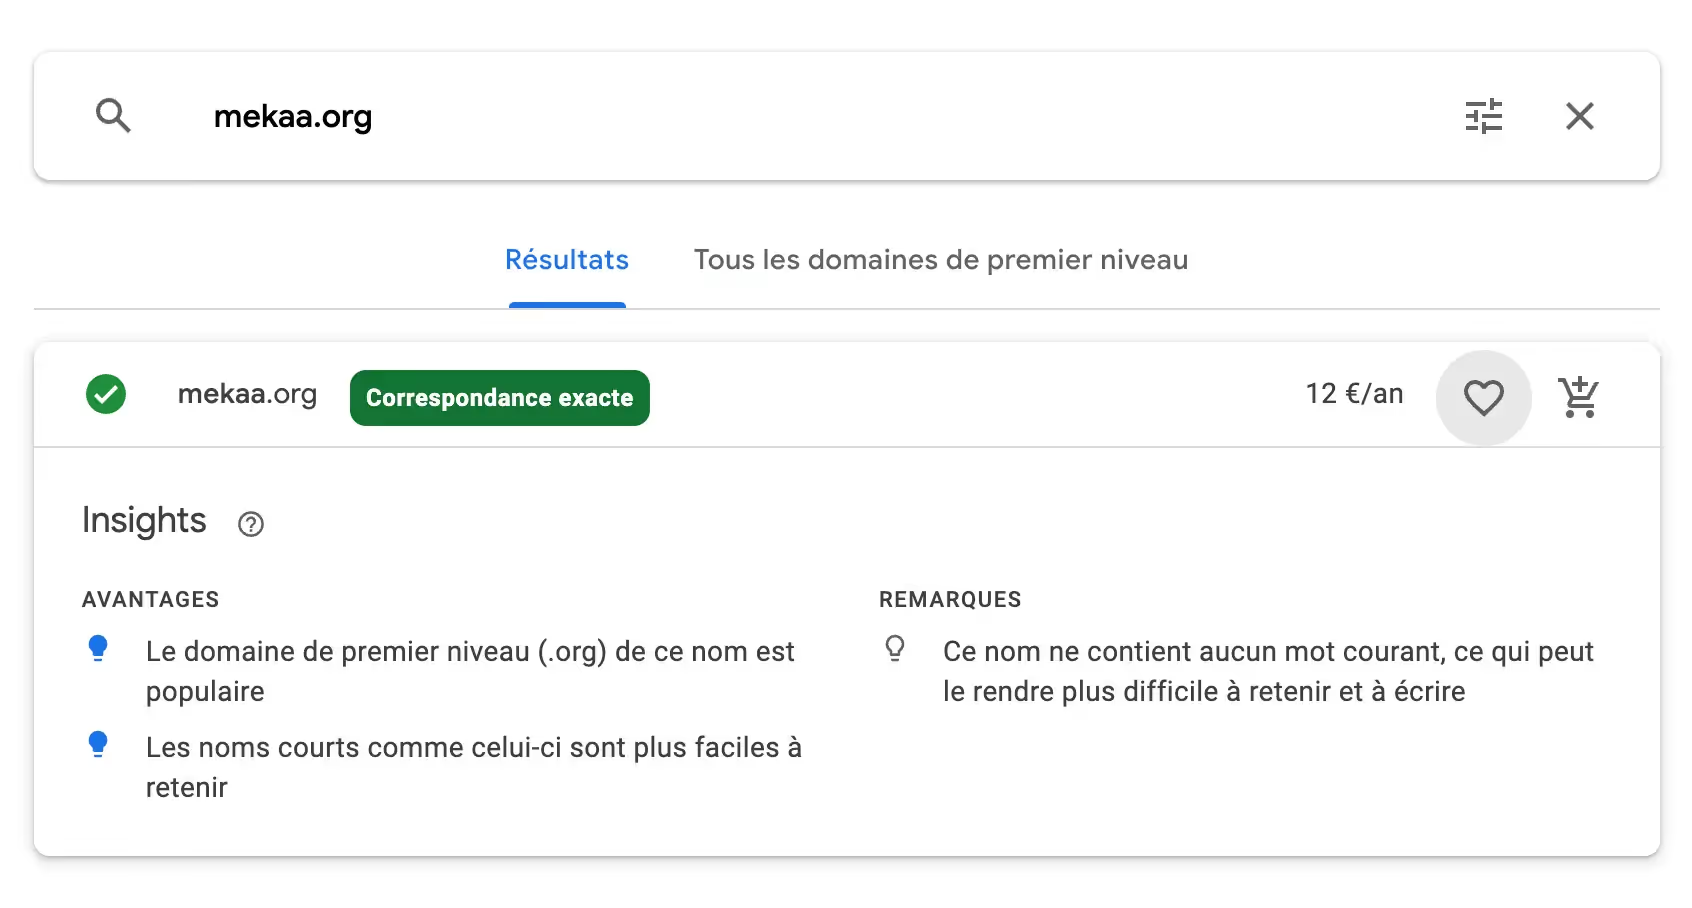
- Check availability: Once you've chosen a potential name, use the availability check tool provided by Webflow to make sure it's not already taken by someone else.
- Buy the domain name: Once you have found an available name, it is time to buy the domain name through a provider such as Google domain, Godaddy, Ionos,...
- Configure DNS settings: After purchasing the domain name, you will need to configure the DNS (Domain Name System) settings to properly link your website to it. Specific instructions may vary depending on the provider selected.
- Activate SSL (Secure Sockets Layer): To ensure the safety of visitors to your website, it is essential to activate SSL. Webflow offers a free and automatic SSL certificate for all sites hosted on their platform.

Step 2 - Add your domain name to Webflow
Buying a domain name with Webflow is an essential step in establishing your online presence. Follow these simple steps and you'll be ready to successfully create and launch your professional website.
Webflow, although offering a free “webflow.io” version, requires a paid package to connect a custom domain name. Depending on your needs, choose from the options offered: basic, CMS, pro, advanced, etc.
Once you have your domain and your Webflow package in place, connecting is pretty easy:
- Go to the “project settings” of your project.
- Select the “Publishing” tab.
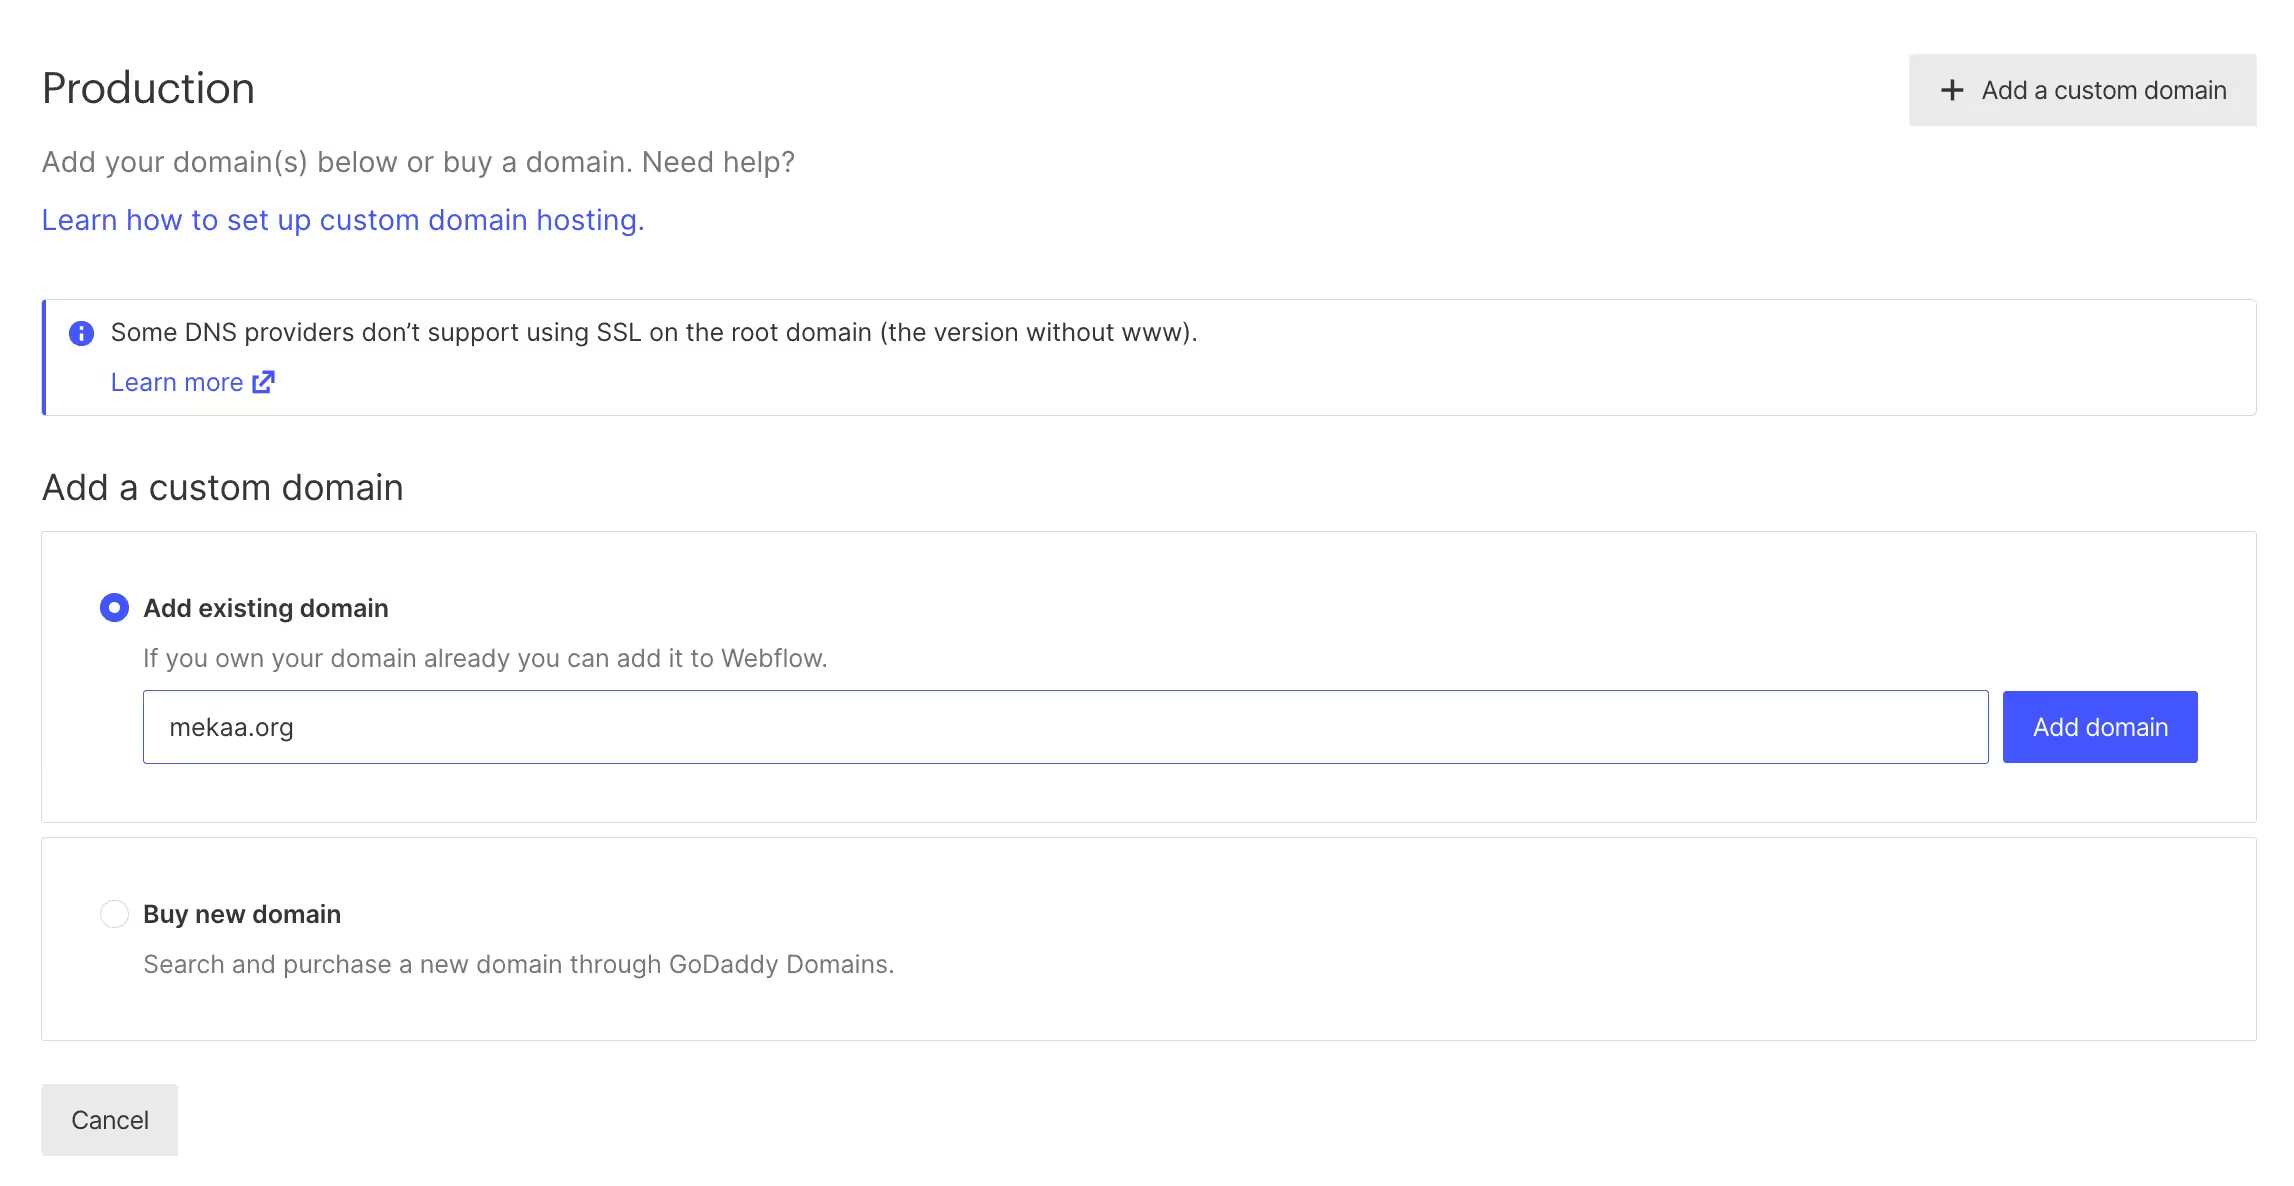
- In the “Production” section, click on “Add a custom domain.”
- Enter your domain name.

And that's it! Let's go to the next step!
Step 3: Add the required DNS records
When you have registered a domain name with a third party provider and want to use it with your Webflow site, you need to add the necessary DNS records. DNS records make it possible to make the link between your domain name and the servers where your Webflow site is hosted.
To add these records, follow the steps below:
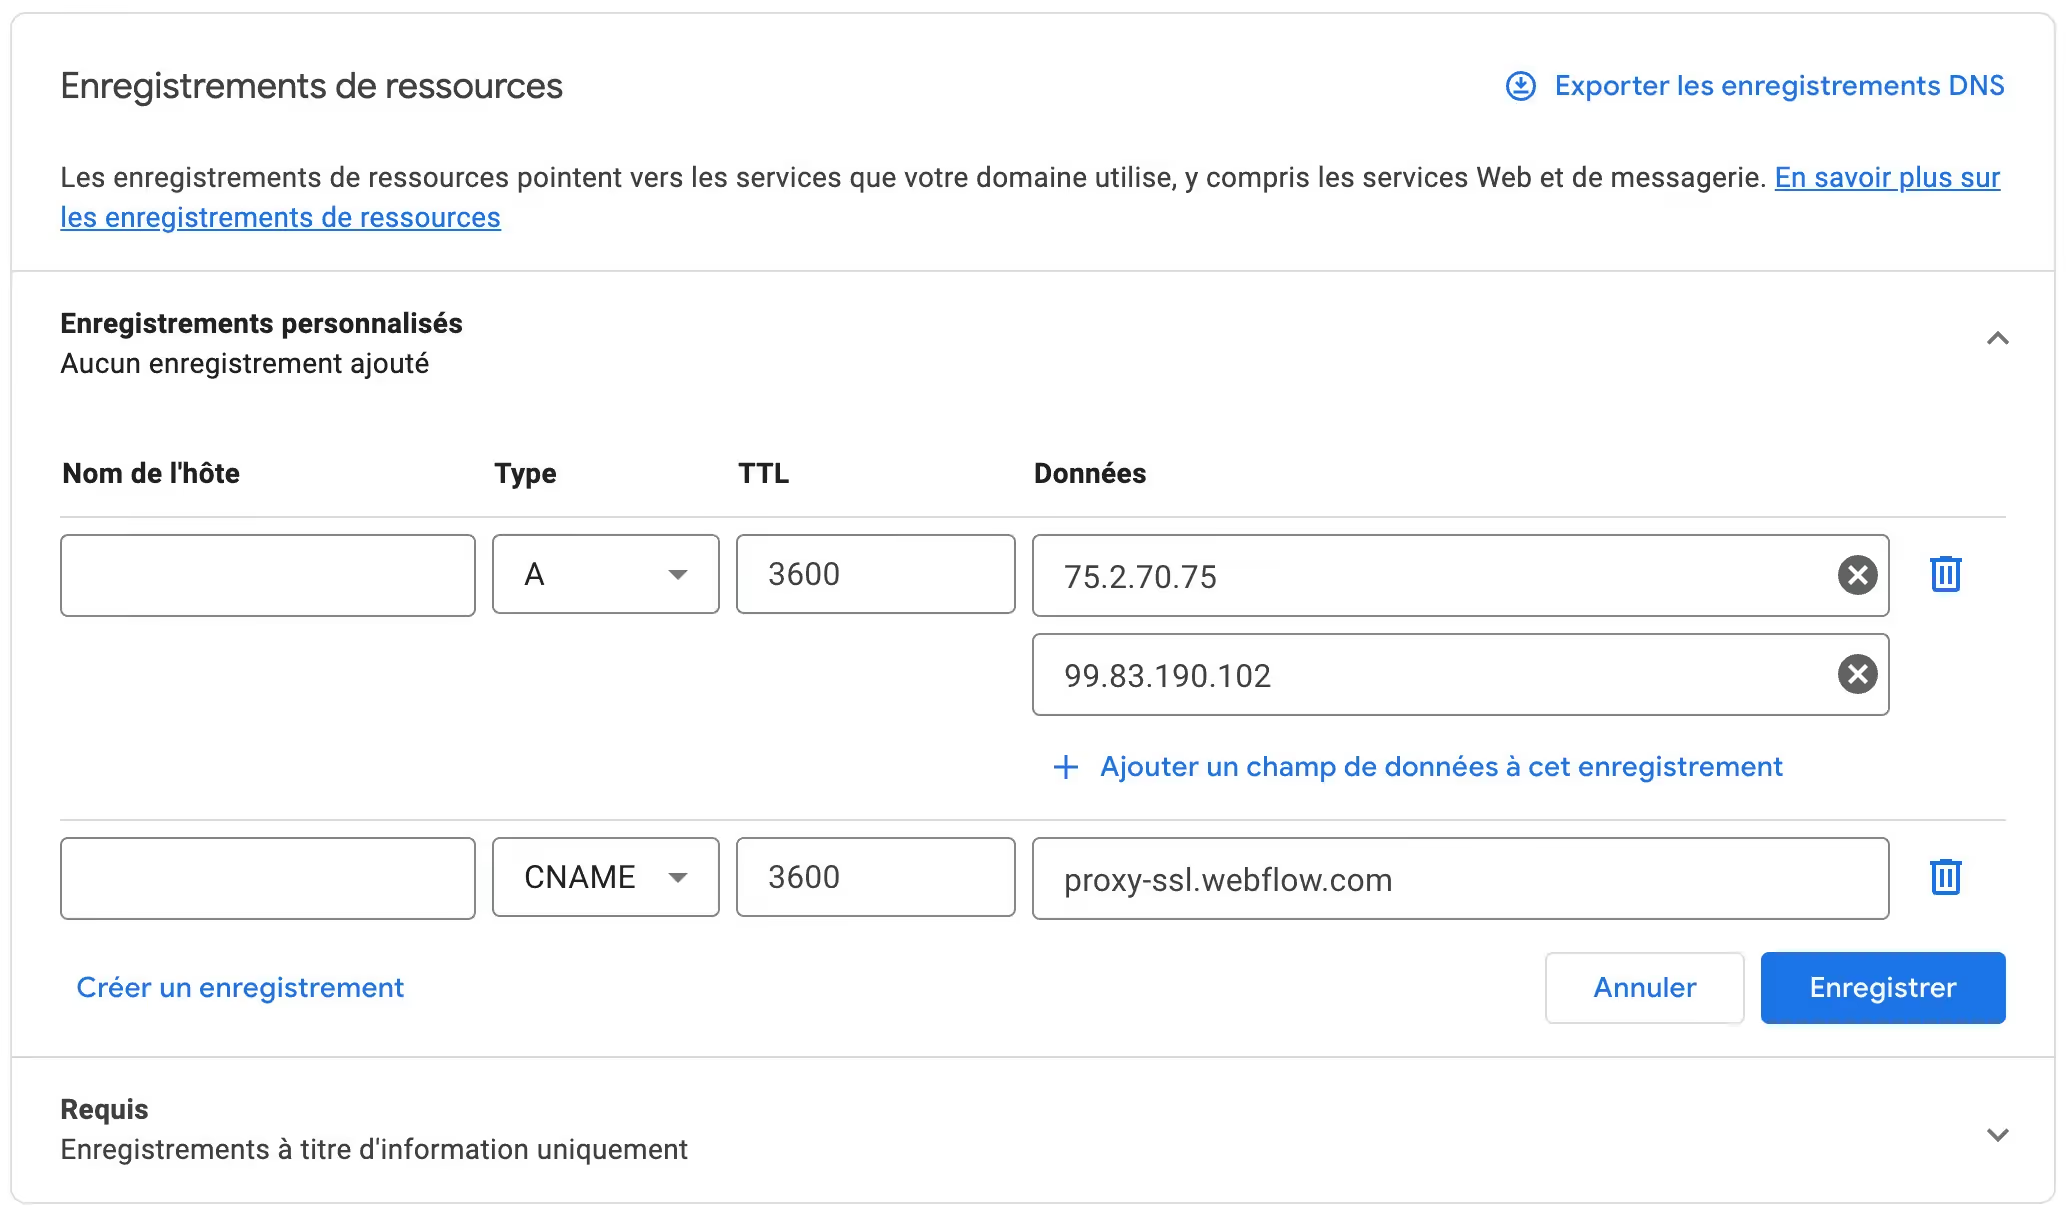
- Log in to your account with your domain name provider.
- Look for the “Domain Management” section or something similar.
- Find the domain name you want to use with Webflow and access its advanced settings.
- Look for the “DNS Records” or “DNS Zone” section.
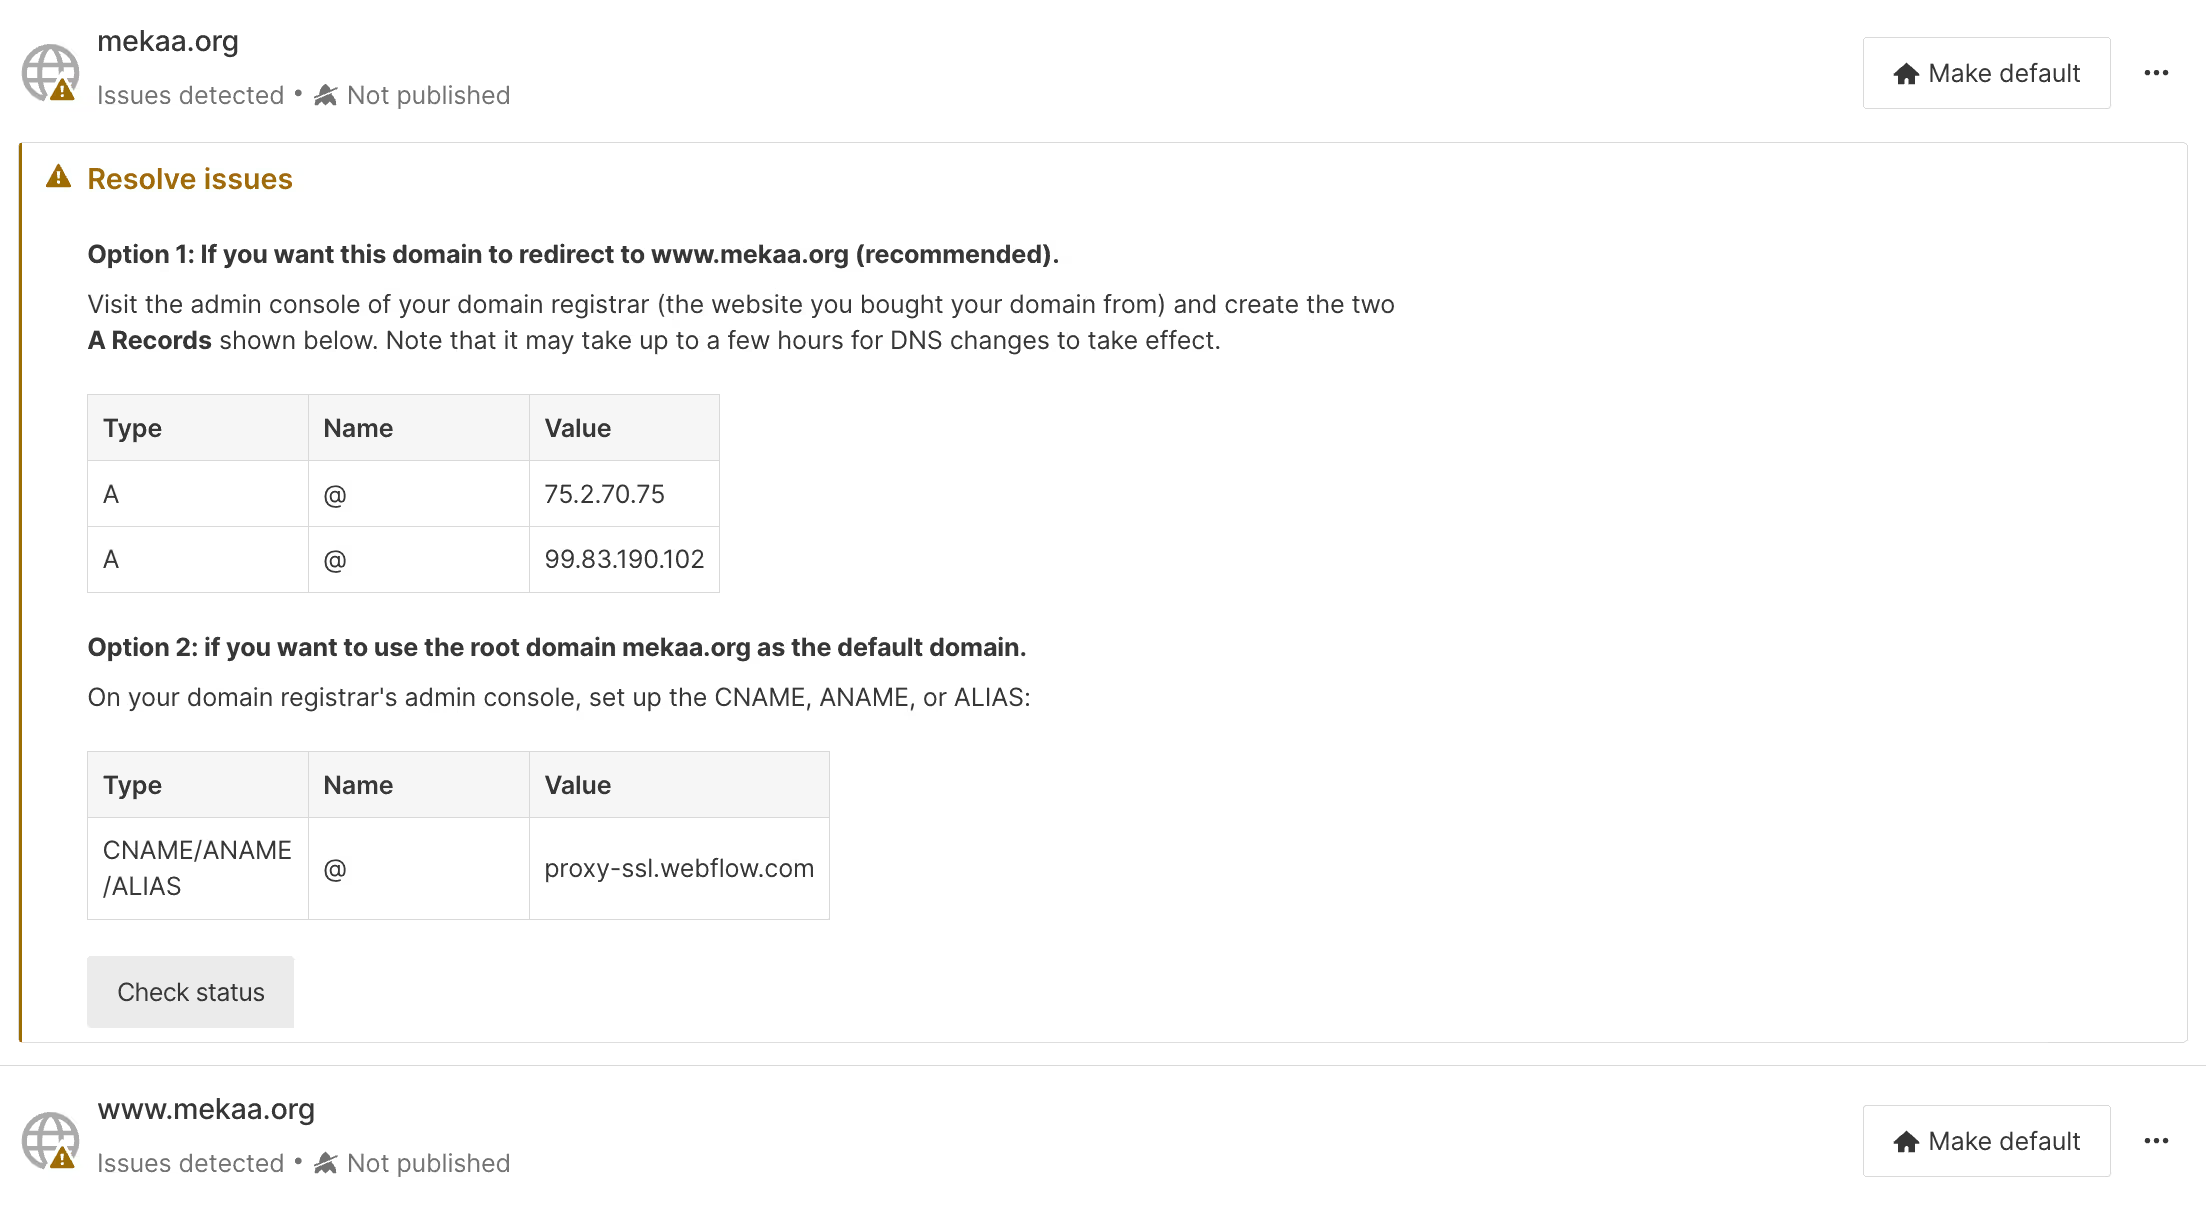
- Add a new DNS record such as CNAME (Alias) or A (IP Address), according to the specific instructions given by Webflow to set up your domain name.
- For the Host Name field (or Name, Target Name, etc.), enter the value provided by Webflow.
- For the Value (or Target IP Address) field, also enter the value provided by Webflow.


Be sure to save each new record you add before moving on to the next one.
Once all the necessary records have been added, it can take a few hours or even up to 48 hours for these changes to spread across the Internet and become effective.
Note: If you already have existing registrations for this domain name, be sure to add only those provided by Webflow, not deleting existing registrations.
Remember to save your changes and check regularly that your domain name is correctly configured with Webflow. Once the propagation is complete, you will be able to take full advantage of the features offered by Webflow with your own custom domain name.
If you encounter difficulties during the process of adding the necessary DNS records, feel free to contact your domain name provider's technical support team or consult the documentation provided by Webflow for additional support.
By following these simple steps and adding the required DNS records correctly, you will be in a position to easily use your domain name with your Webflow site. Take the opportunity to strengthen the professional presence and brand image associated with your website.
{{banner}}
Step 4: Verify the propagation of DNS records
After setting up your Webflow domain name, it is essential to check the propagation of the DNS records. This step ensures that your domain name points correctly to your website hosted on Webflow.
DNS record propagation refers to the time it takes for changes to DNS records to propagate through DNS servers around the world. This means that when you make changes to your DNS settings, there may be a delay before these changes are visible to all users.
To check the propagation of DNS records, you can use various online tools that will tell you if your changes have been applied correctly and if the domain name does not point to your website on Webflow. Some of the popular tools include:
- DNS Checker: It allows you to check the current status of the DNS records for your specific domain name. All you need to do is enter the domain name in the search bar and click “Check.”
- WhatsMydns.net: This tool shows you the current global propagation status for your DNS records. You can select the registration type (A, CNAME, MX, etc.) and enter your domain name to get the results.
- MxToolbox: In addition to searching MX servers (for emails), this tool also offers a feature for verifying DNS records. Simply enter your domain name and click on “MX Lookup” to get the results.
When using these tools, be sure to enter your domain name correctly and select the correct type of registration for accurate verification. If the results show the correct DNS records and the status is “OK” or “Verified,” it means the propagation was successful.
It's imperative to note that DNS records can take up to 48 hours to propagate, although in most cases it happens much more quickly. If you experience ongoing issues after this time, it is recommended that you contact Webflow Technical Support for additional support.
In reflection, checking the propagation of DNS records after setting up your Webflow domain name is crucial to ensure that your website is accessible via this domain name. Use the tools mentioned above to check the current status of the DNS records and make sure they point correctly to your site on Webflow.
{{banner}}
Conclusion
Choosing a domain name is essential for the visibility and success of a website. In this article, we explored in detail the benefits and features that Webflow offers for creating websites. Now that you have a better understanding of the importance of a domain name in the context of Webflow, it's time to wrap up.
A well-chosen domain name can have a significant impact on the natural referencing, reputation and credibility of a website. By using a relevant and memorable domain name, you can attract more users to your site.
Webflow offers a user-friendly platform that allows not only the creation of the site design but also the registration of the domain name. With its intuitive interface, you can easily find available names that match your brand or business.
It is also important to take into account certain tips when choosing a domain name to optimize its visibility on search engines:
- Choose a short and simple name: Short names are easier to remember and can be typed more quickly by users.
- Opt for a content-related name: A good choice would be a name that directly reflects the site's main subject or activity.
- Use relevant keywords: Including keywords wisely in your name can improve your search engine rankings.
- Avoid special characters: Special characters can make it difficult to remember or write the domain name manually.
- Consider the extension: Choose an appropriate extension based on your target audience and geographic location.
In short, choosing a suitable domain name is essential for the success of a website on Webflow. By following the tips mentioned above, you can maximize the visibility and impact of your site on search engines. Also, be sure to use the user-friendly platform offered by Webflow to facilitate domain name registration and management.
If you have a problem connecting with your domain name, Contact us for a free consultation !


